- > FFXIV Aether Currents Guide: Unlock Flying in Every Zone
- > FFXIV Rule Breakers Attire Guide: How to Get It, Dye Options, and Glamour Tips
- > FFXIV Dawntrail Savage Raids Tier List - Best to Worst
- > FFXIV Valentione's Day 2026 Event Guide: Quests, Rewards & More
- > How to Farm Crystal Paste in FFXIV Patch 7.41
- > How to Obtain Obscurum Phantom Relic Weapons in FFXIV 7.41
The FFXIV Summoner Rotation Guide
In FFXIV, Being summoned is one of the Powerful caster jobs. It's distinctive because it's the only player in the game who is entirely reliant on summoned monsters. In some versions, Summoner used to be more of a general spell caster, but the latest Shadow bringers' iteration brings them closer to the playstyle represented by the job's name. FFXIV Summoner's abilities include a high damage output, which is very useful in crowded situations.

They're instrumental in Raids, where a large number of opponents can stand close around. They're also great supporters because they can restore the party's healers if they die. With this in mind, many players are eager to test out Summoner. Fortunately, veteran Summoner has set out several tips and techniques to assist newbie Summoners. Some even consider FFXIV Summoner to be one of the most acceptable classes for newcomers!
Basics of the FFXIV Summoner
An experienced and skilled Summoner can combine high destructive output with a large amount of utility. This job can provide significant benefits, defensive capabilities, and a restoration spell, among other things. Normal damage spells, Damage over time effects, and, of course, summoned monsters and their attacks all contribute to their DPS.
Summoner is one of the very few and most recognizable jobs in Final Fantasy XIV. It is linked to a combat class like the other jobs featured in Final Fantasy XIV: A Realm Reborn. Becoming a Summoner, you must first reach level 30 as an Arcanist. Either of these transfers takes place in Limsa Lominsa's Arcanist's Group. They protect themselves with fabric armor and utilize spell books as weapons to enhance their magic.
FFXIV Summoner Job Rotation Guide
The rotation of Summoner in FFXIV will be discussed here. It should be evident that the Summoner has a great deal on his plate and must manage various resources to complete their rotation. As you level up, you'll find that many new abilities replace old capabilities. The Summoner will experience Trances where different skills can be substituted for the duration of the Trance. At Stage 80, your Hotbar will be continually changing as you progress through the various parts of your FFXIV Summoner Rotation, so keep track of which skills replace what. Furthermore, if you are searching for a way to buy FFXIV Gil to improve your gameplay and to buy premium stuff, then keep in mind that you can purchase in-game currency from different marketplaces.
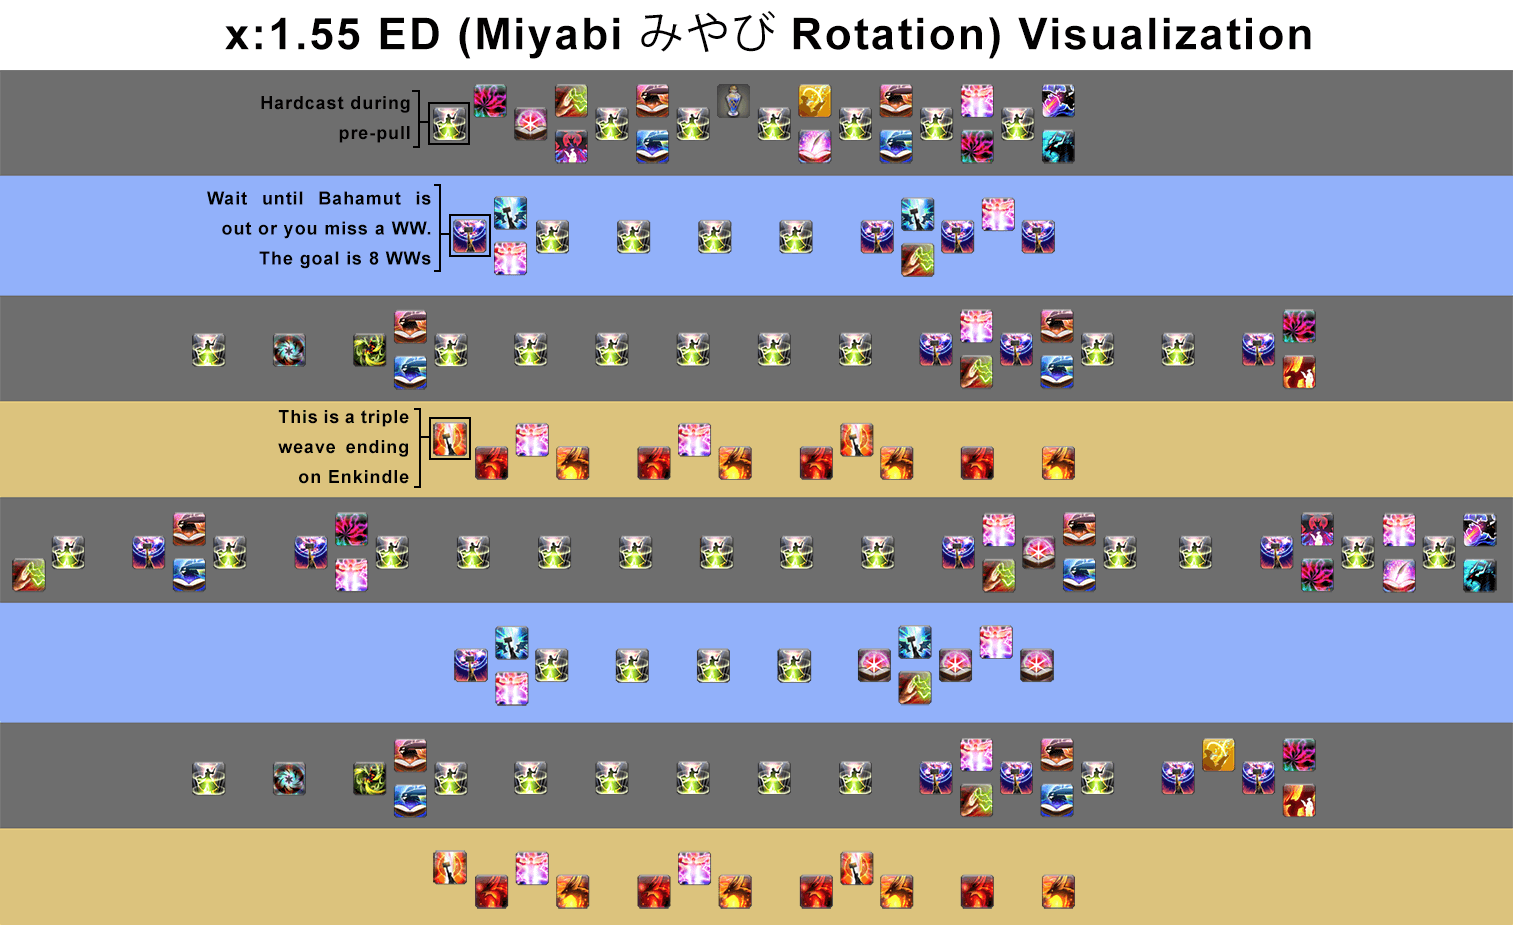
FFXIV Summoner's Rotation
The Summoner's rotation is sometimes described in terms of "phases." Each step builds on the preceding one to pull off your huge summoning and maximize your Damage during them. It's also critical to maintain your DoTs during the process!
Learn how to Build Aetherflow Gauge
To perform Dreadwyrm Trance, you must first start building up your Aetherflow Gauge. It increases your Trance Gauge, allowing you to Summon Bahamut and perform Akh Morn. You'll have a filler cycle after the Bahamut phase concludes while you wait for Firebird Trance to get off cooldown. Egi Assaults and Ruins should be used as much as feasible during this filler period. Then you'll enter Firebird Trance and take advantage of the Phoenix talents it bestows. You'll go through another filler phase, identical to the first, but this time you'll need to focus on replenishing your Aetherflow Gauge to perform Dreadwyrm Trance. The cycle will then repeat itself.
Rotations and playstyle tips
Summoner is amongst the most challenging jobs in Final Fantasy XIV. Many of their abilities and spells must be performed in a precise order. It's not reliant on random preceptors, but it does need you to produce and spend several resources on specific tasks.
Summoner's resources and interactions
Furthermore, Ruin IV can be used in place of Ruin II. It's an instant cast spell with high potency. Egi Assault II and Egi Assault can be used to create the Further Ruin stacks. If you're not in the Dreadwyrm Trance of Firebird Trance, this tool is handy. Ruin IV is a more potent version of Ruin III and can be performed instantly. It allows for greater agility and weaving.

The two powerful summonses have the most significant cooldowns that we're working through. They're linked to the abilities of Summon Bahamut, Dreadwyrm Trance, and Firebird Trance. Your most strong DPS tools are the two 20-second windows with plenty of bonus damage. Because of the interplay between your skills, you must utilize this summons simultaneously. Firebird Trance and Dreadwyrm Trance both have a 55-second cooldown when used together. It implies that there will be some delay between them. Rather than a single 40-second burst window, you'll get two 20-second blast windows staggered.
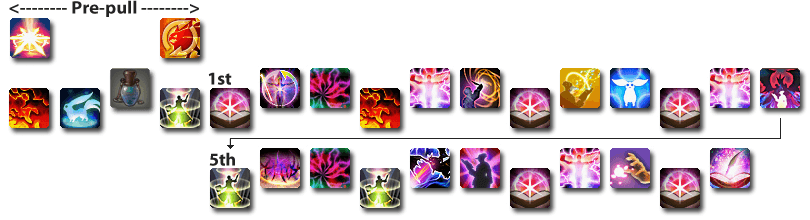
Opener
As you likely already know, the opener aims to impose as much harm as possible while also utilizing all of the potent and crucial cooldowns to have them up so early and maximize their use. Due to many important cooldowns and several unique connections between different components of their kit, summoner rotation FFXIV and openers are known for being extremely long and complex.
It would help if you were prepared to begin casting 2.5 seconds before your tank begins to pull in a well-coordinated team. In the case of Summoning, Ruin III is the sole possible option. However, if you cannot do so with your group, you will only suffer a slight DPS reduction.
Downtime
Your Bahamut will perish at the end of the opening, putting you into your 1st downtime phase. While you wait for Firebird Trance, you want to maximize your Damage. A few of your cooldowns will return to their original state. Egi Assault II and Egi Assault, and the cast of Ruin IV that they allow, should be used. You should be able to utilize Energy Drain and Fester as well. Besides, casting Ruin III (does more hit) or Ruin II (does minor Damage) will only keep your GCD running. If your DoTs are about to expire and the Tri-disaster is always on cooldown, you'll have to throw Miasma III and Bio III.
Phoenix phase
It's time to begin the Phoenix phase while Firebird Trance has finished its cooldown. It's the sec 20-second period with high Damage. Throughout that period, Fountain of Fire replaces your Ruin III, and you have accessibility to Brand of Purgatory. In the Firebird Trance, these two spells are necessary. Enkindle Phoenix is the most crucial oGCD, thus include it at least twice. You'll want to construct Enkindle Phoenix and other oGCDs if they're accessible.
The second downtime period begins now. It's a little longer this time. Once again, you should use Ruin IV and Egi Assaults as much as you can while maintaining 100% DoT uptime. When the cycle begins, this phase will persist until your Dreadwyrm Trance is unlocked. It takes about two minutes to complete the entire process, which involves Phoenix, Bahamut, and two periods of inactivity.
Conclusion
That concludes our FFXIV Summoner rotation job guide! This is one of FFXIV's most complicated skills right now, but it's one of the game's biggest damage providers. Summoners will be thrown for a circle by the adjustments in Endwalker, so register to our website and follow us on social networks for more FFXIV articles and guides like these!
Recommended Article